How to Wire a Light Fixture with Two Black Wires | Step-by-Step Guide
To wire a light fixture with two black wires, you have to connect the two black wires from the electrical box after wiring the two white wires. Twisting an orange wire nut onto all three wires will be helpful here.
The color coding differs in different nations due to varying electrical standards. The National Electrical Code (NEC) in the United States (US) uses black and white color codes. The hot wire is black, while the neutral is white.
Why Aren’t The Light Fixture’s Wires Color Coded? Reasons Behind That
Light fixture wires are typically not color-coded with standard color-coding conventions because they do not carry the same electrical designations as the wiring inside the walls of a building. The reasons behind this are as follows:
1. International Standards: Electrical systems and components often need to adhere to international or regional standards, and these standards may not mandate specific color coding for fixture wires. For example, the International Electrotechnical Commission (IEC) and the National Electrical Code (NEC) in the United States provide guidelines for electrical wiring but do not require color-coding of fixture wires.
2. Simplicity and Compatibility: In many cases, light fixtures are designed to be compatible with various wiring systems and configurations. By not color-coding the wires, manufacturers ensure that the fixtures can be connected to different electrical systems without confusion.
3. Universal Design: Manufacturers often aim for universal design to make their products suitable for a global market. Using consistent wire colors across different regions may not be feasible due to variations in local electrical codes and practices.
4. Safety Labeling: Instead of color-coding, light fixtures often have labels or markings to indicate the purpose of each wire. These labels may include “live,” “neutral,” “ground,” or symbols to help installers make the correct connections.
5. Local Codes and Practices: Electrical codes and practices can vary from one region to another. What might be considered a standard wire color in one place could have a different meaning or application elsewhere. As a result, color coding could lead to confusion in certain areas.
How to Identifying the Light Fixture Wires
Identifying light fixture wires is essential for safe and correct installation. While the wires themselves are typically not color-coded with standard conventions, you can still identify them through various means. Here’s how to do it:
1. Read the Installation Manual: The first step should always be to consult the installation manual or instructions provided by the manufacturer of the light fixture. These instructions often include diagrams or descriptions of the wires and their purposes.
2. Visual Inspection: Examine the wires closely. While they may not have standardized colors, you might notice differences in the wires’ appearance. For instance, the insulation on one wire may have a ribbed or textured surface, while the other is smooth.
3. Use a Voltage Tester: A non-contact voltage tester can help you identify the hot wire. Turn off the power to the fixture at the circuit breaker, then carefully touch the tester near each wire. The tester will indicate which wire is hot (live) by beeping or lighting up.
Required Tools for Wiring a Light Fixture with Two Black Wires
You will need the pliers to ensure tight connections between the wires. You may have to twist the wires with that plier. A non-contact voltage tester will also be required to ensure that there is no voltage. Additionally, it will be used when locating the hot and neutral wires.
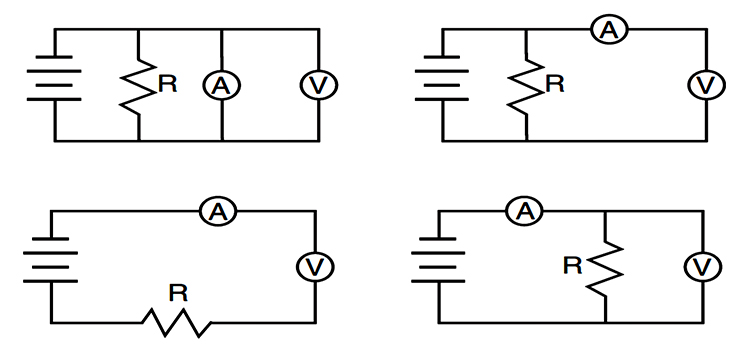
You have to have a circuit analyzer like a multimeter or voltmeter to display immediate information about the circuit to connect the light fixture. Wire nuts, screwdrivers, and strippers are also necessary for this operation.
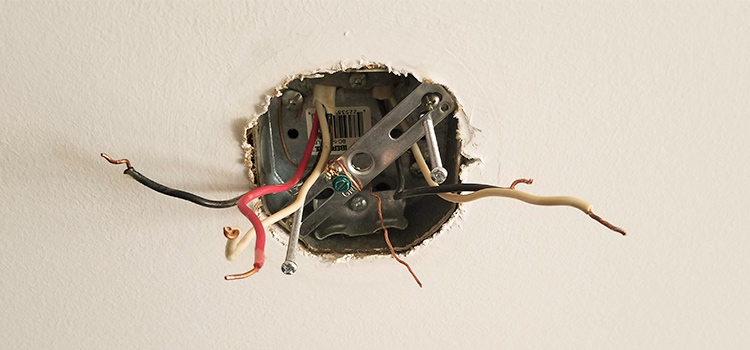
How to Wire a Light Fixture with Two Black Wires
Each lightbulb in your home receives power from two cables. When you have several light sockets in your light fixture, you multiply the number of electrical wires that will need to be connected to a power source.
The rear side of a light fixture may appear scary, but keep in mind that if you can match black to black and white to white, you can install a light fixture with double wires or more. Follow the steps below to wire a light fixture with two black wires.
Step 1 | Distinguish Between Hot and Neutral
Check the ceiling wires using a phase tester or voltage meter (mostly black and white). The two black wires from the light fixture can be linked alternately for AC (alternating current) supply. Furthermore, some light fixtures with two black wires have various labels to distinguish between hot and neutral.
Similarly, a closer examination of the wires may reveal that one has a rough texture (hot) while the other has a smooth texture (cold, neutral). In another case, the light switch may have two black wires while the light fixture may have one black and one white wire. The phase tester can identify the hot and neutral wires.
Step 2 | Switch Off the Circuit
Always check whether the power supply at the place of installation is turned off as a precaution. To accomplish this, make sure the breaker is turned off or the fuses are removed.
Then turn off the light fixture’s power switch. Before beginning any work, use a voltage tester to confirm that there is no power at the electrical cables from the wall switch.
Step 3 | Check Polarity
Hook the fixture temporarily to the ceiling rise and do a live test without mounting it. Connect one of the fixture wires to the switch’s hot (black) electric wire and the other to the neutral (white) electric wire. Attach one probe to the fixture pocket sleeve and the other to the ground wire using a voltage meter.
Turn on the electricity and take caution to avoid any shock. The polarity of the wire is flipped if there is a positive voltage signal. Reverse the electrical connector to correct the polarity.
Step 4 | Check Base and Ceiling
Check the fixture mounting base to ensure it fits the ceiling rise after locating and identifying the wires in step 1 above. For a new installation, you may need to take additional base measurements and make a mark on the ceiling.
For a replacement, however, double-check that the fixture base and ceiling rise measurements are the same and that they fit. There’s no need to disassemble them if they fit.
Step 5 | Attach the Base
Align the mounting holes on the fixture face with the bolts on the base and place them on the ceiling. Hang the light fixture and electrical cables from the switch from the light fixture base on the ceiling rose. Using the suitable size wrench, tighten the given nuts onto the base bolts.
Step 6 | Wire it
Make sure the power supply is turned off at the breaker before connecting the wires with the right polarity. Now, using a wire stripper, remove approximately half-inch of the insulation coat of the tip of the black wires. Make connections and wire the fixture based on the findings of the polarity check and wire identification.
Secure each connection with wire nuts to avoid a loose connection and electric shock. Connect the ground/earth wire to the pin positioned on the body of the light fixture and tighten it. If the fixture does not have a ground pin, drill a hole in the base and use a screwdriver to install a ground screw.
Step 7 | Insert Light Fixture
If the fixture needs a bulb to be inserted, do so in each of the receptacles. Replace the fuses that were previously removed and switch on the circuit breaker. With the appropriate wall switch, you can test the functionality of the light fixture.
Safety Precautions
To avoid electric shock, make sure the tool’s insulation is intact. Also, check the light fixture and circuit for any warning indications and make a note of them. Again, make certain that the local electrical code is followed. Use insulated rubber gloves to avoid electric shock in the event of inadvertent contact with a hot wire.
Frequently Asked Questions
Which wire is positive if both wires are black?
The black wire is the negative wire, while the red wire is the positive wire. The striped wire is negative, whereas the plain black wire is positive if both wires are black but one has a white stripe.
Conclusion
Though every step to wire a light fixture with two black wires is described, pay close attention to the directions in the guidebook and the safety precautions. Correct wiring of light fixtures and other electrical components assures the equipment’s long-term reliability.
Subscribe to our newsletter
& plug into
the world of circuits
![[Explained] How Many Valence Electrons Does a Conductor Generally Have?](https://www.circuitsgallery.com/wp-content/uploads/2023/11/How-Many-Valence-Electrons-Does-a-Conductor-Generally-Have.webp)