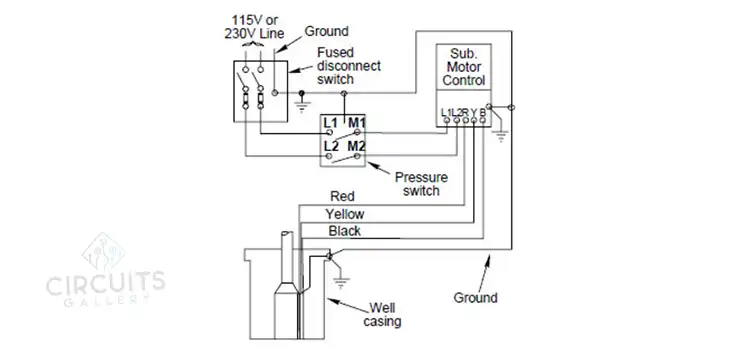
3 in 1 Start Capacitor Wiring Diagram
If the cover from the compressor relay/start device is removed, you should find three pins for the unit, labeled r, c, and s. The 3in1 will tell you where to connect the bk, rd, and wh. wires to match. The L1 and N wires are the other two wires. Connect the condenser fan to the existing start device.
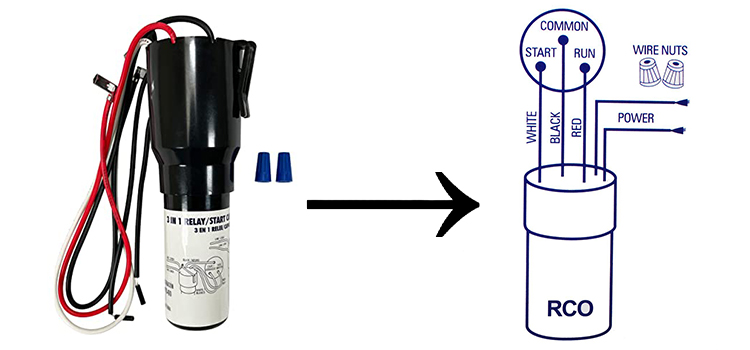
3 in 1 Start Capacitor Wiring Diagram
The processes for selecting and installing the capacitor are the same whether you are replacing a start or run capacitor or installing a hard-start capacitor to keep a difficult electric motor running.
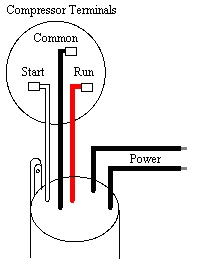
The terminals may already be labeled on many systems, allowing the three leads on a start/run capacitor to be wired properly. There, S stands for a start wire connector, R stands for run wire connector and C stands for the common connector.
How Do You Hook up a 3-in-1 Capacitor
3 in 1 start capacitor basically has 5 wires, 2 wires to power it, and the other 3 wires connected to the pins on the side of your compressor. At first, notice the three wires coming out of one side and two black wires coming out of the other side at the top of the capacitor.
The pins on the compressor are placed shaping a triangle. To the far left, connect the white wire. Connect the black wire to the center pin and the red one to the remaining pin.
How Do You Wire a Hard Start Capacitor
A hard start kit is an energy-storing capacitor that aids in the start-up of your air conditioner when it is having trouble. Hard start kits, as their name implies, assist in the resolution of a problem known as hard starting, which occurs when an air conditioner struggles to come on and then abruptly shuts off after a short period of time.
For wiring, a hard start capacitor, first take the home wire coming from the compressor and connect it to herm labeled on the run capacitor. Now take the red wire and connect it to the common. The remaining section is ‘fan’ which is often connected with the brown wire.
Now take one black wire from the hard start kit and connect it to the common capacitor. Finally, take the other black wire and connect it to the herm of the capacitor. Your wiring is now complete.
What Are the 3 Pins on a Refrigerator Compressor
Run, Common and Start winding pins are labeled “S”, “C”, and “R” on the three pins of the compressor. Set the digital meter’s function switch to the R x 1 scale and locate the two pins that produce the greatest reading.
These are the run and start winding pins, and the last pin is the common pin if the pins are not indicated. The compressor is defective and needs to be changed if the meter LCD displays a “O.L.” while checking between any two of the pins.
How Do You Bypass a Compressor Relay on a Refrigerator
The link between the refrigerator relay and compressor is critical for conserving energy and ensuring optimal refrigerator functioning. It also prevents the refrigerator from overheating. If you have an option, you should aim to avoid bypassing the refrigerator relay whenever possible.
Safety Considerations
You must unplug your device and turn off the circuit breaker before attempting to put your refrigerator into bypass mode. After that, you’ll need to enlist the assistance of an adult to move the refrigerator away from the wall. Refrigerators are not only large and heavy, but they also act as tripping hazards.
Procedure
Here are the steps for bypassing the refrigerator relay.
Step 1: Withdraw the Cover Plate
You must follow the above-mentioned safety precautions. After that, cover the plate on the refrigerator’s lowermost back and remove it with a screwdriver. Put the cover plate aside.
Step 2: Drag the Metal Box
To remove the metal box in the refrigerator’s lower right corner, drag or turn it. After you’ve removed it, examine the refrigerator relay system. To press down on the area between the relay and its container, you’ll need a flathead screwdriver.
Step 3: Unplug the Wire
To disconnect the relay from the refrigerator, press on it and drag it out. Then, unhook the wire from the relay to make it convenient. Undo the metal connector that connects it to the relay system, then use pliers to cut some of the wire that is less than 14 inches on both sides.
Step 5: Bypass the Misplaced Relay
Connect either end of the wire to the relay housing with electrical tape so that it fully bypasses the misplaced relay and shuts off the circuit. After doing this, restore the relay system container lid and the cover plate at the back of the refrigerator.
Step 6: Regulate the Refrigerator
Plug the refrigerator back in after restoring the power at the circuit breaker. Regulate it for a few hours to ensure that the compressor is in great working order. If you hear the compressor start-up and create a clicking or buzzing sound while regulating, you can infer the relay is defective.
Do not leave the refrigerator in relay bypass mode for an extended period of time to avoid bypass compressor surplus. This simple remedy will get your refrigerator operating for a while, but you’ll need to contact a repair mechanic to assist you to repair the refrigerator relay and get it back in working order as soon as possible.
Conclusion
3 in 1 capacitors are widely used in refrigerators. It usually helps to connect the compressor to the hard start kit. It also helps in relay bypassing. The connections and process are quite easy. However, it’s necessary to abide by the important precautions and aftermaths.
Subscribe to our newsletter
& plug into
the world of circuits

![Is a Neutral a Current Carrying Conductor [Answered & Explained]](https://www.circuitsgallery.com/wp-content/uploads/2023/10/Is-a-Neutral-a-Current-Carrying-Conductor.webp)
wonderful
Thanks for your comment! Stay tuned with us.