Simple Arduino Projects for Beginners- Real-Time Clock With Alarm
You may find many simple Arduino programs in the Arduino IDE software itself (in File → Examples). But this is a more powerful beginner Arduino project which uses a 16×2 LCD module to display time and alarm settings. 3 push buttons are provided for selecting alarm mode and time mode together with Minute and Hour adjustments.
Projects with Arduino are very easy and simple to implement because of its all in one features. We have many more Arduino project ideas that will be published one by one. This is one of our Arduino beginner projects with simple Arduino programming.
What is Arduino?
Arduino is the best Microcontroller designed for Teachers and Students. It became more popular due to its ease of use and programmability.
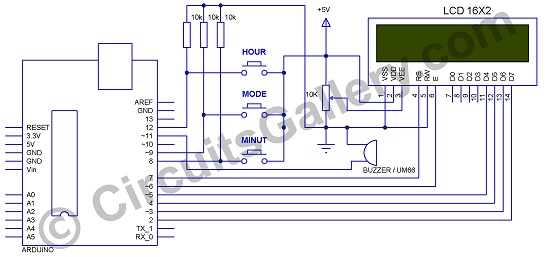
Schematic diagram of Arduino Real Time Clock
Components Required
- Arduino board
- Arduino software IDE
- Resistor (10KΩ x 3)
- LCD 16×2
- Buzzer / UM66 with speaker
- Push-button x 3
Working of Arduino Project
- LCD 16×2 is used to display time and alarm, which is connected to digital pins 2 to 7 of Arduino board.
- A variable “alm” is declared as Boolean and it will change the state between Clock and Alarm when we press the mode button that is connected in pin 9.
- Initially “alm” is declared as FALSE, which helps to display time on the LCD screen the first time when the system is ON.
- Three pushbuttons are used here for setting up time and alarm, one for mode selection, remaining for minutes and hours.
- If the mode button is pressed the variable “alm” becomes TRUE then program control will display an alarm.
- When the system is running in TIME MODE, we can set time by using the minute and hour button directly without entering any mode.
- The device can be switched to ALARM MODE by pressing the Mode button, then the same buttons (minute and hour) are used to set alarm.
- How does the alarm logic work? It is simple, while the system running in any of the modes it compares Clock time with Alarm time with AM/ PM.
- If the clock time matches with the alarm time then LCD will display “RINGING” and it will set pin 11 which is connected to a buzzer or any other audio device, here we used UM66 with a buzzer.
- The duration of the Alarm sound is set to 1 minute.
- There are no external components are used in the Arduino real-time clock alarm, which makes our project more flexible.
You can make this as a device timer by simple changes in the program and circuit, the delay time that the duration of alarm can be increased, and connect a relay at the 9th pin with a relay driving transformer. I’m planning to post it in the upcoming Arduino series.
Real-Time Clock Arduino Program Code
Here I’m adding the Arduino program code for our project.
[cc lang=‘c’]
//include lcd library
#include
//lcd(RS, E, D4,D5,D6,D7);
LiquidCrystal lcd(7, 6, 5, 4, 3, 2);
const int backlight =13;
const int buttonHr = 12;
const int buttonMin = 8;
const int buttonalm = 9;
const int buzzer = 11;
int secs =0;
int secs2 = 0;
int mins = -1;
int hrs = 12;
int amins = 1;
int ahrs = 12;
int atime = amins+1;
boolean isAM = true;
boolean isAAM = true;
boolean alm = false;
int milliDivSecs = 1000;
int milliDivMins = 60000;
int milliDivHrs = 360000;
unsigned long prevmillis=0;
int interval = 1000;
void setup()
{
pinMode(backlight, OUTPUT);
pinMode(buttonHr, INPUT);
pinMode(buttonMin, INPUT);
pinMode(buttonalm, INPUT);
pinMode(buzzer, OUTPUT);
digitalWrite(backlight, HIGH);
lcd.begin(16,2);
lcd.setCursor(0,0);
lcd.print(” TIME “);
lcd.setCursor(0,1);
lcd.print(” 12:00:00 AM “);
updateAAMPM();
Serial.begin(9600);
}
void loop()
{
unsigned long currmillis = millis();
if(digitalRead(buttonalm) == HIGH)
{
updatealm();
delay(400);
}
///////////#############—-ALARM—-###############/////////////////
if(alm)
{
atime = amins+1;
lcd.setCursor(3,0);
lcd.print(“ALARM”);
lcd.setCursor(5,1);
lcd.print(“:”);
lcd.setCursor(8,1);
lcd.print(” “);
updateAmin();
updateAhrs();
AA();
if(digitalRead(buttonHr) == HIGH)
{
delay(25);
ahrs = ahrs+1;
updateAhrs();
//update AMPM on button press
if(ahrs==12)
{
updateAAMPM();
}
delay(400);
}
if(digitalRead(buttonMin) == HIGH)
{
delay(25);
amins = amins + 1;
//Serial.println(mins);
updateAmin();
delay(400);
}
}
////////////////////////////////////////////////////////////////////////////////////////////////////////////
else
{
lcd.setCursor(3,0);
lcd.print(” TIME”);
lcd.setCursor(5,1);
lcd.print(“:”);
lcd.setCursor(8,1);
lcd.print(“:”);
updateHrs();
updateMin();
TT();
//detect button pressing
if(digitalRead(buttonHr) == HIGH)
{
delay(25);
hrs = hrs+1;
updateHrs();
//update AMPM on button press
if(hrs==12)
{
updateAMPM();
}
delay(400);
}
if(digitalRead(buttonMin) == HIGH)
{
delay(25);
mins = mins + 1;
updateMin();
delay(400);
}
}
if(currmillis-prevmillis > 999)
{
prevmillis =currmillis;
if(secs<10) { lcd.setCursor(10,1); lcd.print(secs); lcd.setCursor(9,1);
lcd.print(0); } else { lcd.setCursor(9,1); lcd.print(secs); } if(secs == 0) {
mins = mins+1; updateMin(); } //get new seconds from system time secs =
(millis()/milliDivSecs)%60; // divide by 1000 and mod by 60 gives seconds from
milliseconds } if(mins == amins && hrs == ahrs && isAAM ==
isAM) { lcd.setCursor(8,0); lcd.print(” RINGING”);
digitalWrite(buzzer, HIGH); } if(mins == atime) { lcd.setCursor(8,0);
lcd.print(” “); digitalWrite(buzzer,LOW); } } void updateMin(){
if(mins > 59){
hrs = hrs+1;
updateHrs(); //update hours then
if(hrs==11 && mins >59){
updateAMPM();
}
mins = 0; //reset mins
lcd.setCursor(6,1);
lcd.print(“00”);
}
if(mins < 10) { lcd.setCursor(7,1); } else{ lcd.setCursor(6,1); } lcd.print(mins);
} void updateHrs(){ if(hrs> 12)
{
hrs = 1;
}
if(hrs< 10){ lcd.setCursor(3,1); lcd.print(” “);
lcd.setCursor(4,1); } else{ lcd.setCursor(3,1); } lcd.print(hrs); } void
updateAMPM() { if(isAM) { isAM = false; lcd.setCursor(12,1);
lcd.print(“PM”); } else { isAM = true; lcd.setCursor(12,1);
lcd.print(“AM”); } } void updateAmin() { if(amins > 59)
{
ahrs = ahrs+1;
updateAhrs(); //update hours then
if(ahrs==11 && amins >59)
{
updateAAMPM();
}
amins = 0; //reset mins
lcd.setCursor(6,1);
lcd.print(“00”);
}
if(amins < 10) {
lcd.setCursor(7,1); } else { lcd.setCursor(6,1); } lcd.print(amins); } //update
hour function void updateAhrs() { //display hours – needs fixing for am pm
if(ahrs> 12){
//reset to 1
ahrs = 1;
}
if(ahrs< 10){ lcd.setCursor(3,1); lcd.print(” “);
lcd.setCursor(4,1); } else{ lcd.setCursor(3,1); } lcd.print(ahrs); } void
updateAAMPM() { if(isAAM) { isAAM = false; lcd.setCursor(9,1);
lcd.print(“PM “); } else { isAAM = true; lcd.setCursor(9,1);
lcd.print(“AM “); } } void updatealm() { if(alm) { alm = false; }
else { alm = true; } } void AA() { if(isAAM) { lcd.setCursor(9,1);
lcd.print(“AM “); } else { lcd.setCursor(9,1); lcd.print(“PM
“); } } void TT() { if(isAM) { lcd.setCursor(12,1);
lcd.print(“AM”); } else { lcd.setCursor(12,1);
lcd.print(“PM”); } } [/cc]
Conclusion
Arduino becomes more and more popular among students as they are simpler and user friendly to use than microcontrollers. This simple project could be a nice starter for you as a beginner on Arduino.
Subscribe to our newsletter
& plug into
the world of circuits
