Build Arduino Based Home Security System Using PIR Motion Sensor
PIR sensors are widely applied in wireless residential security systems, home alarms systems, and many more security circuits as motion detector sensors. A typical PIR sensor detects the infrared red (IR) waves from the human body. And, so, it is also known as the ‘human sensor’.
It would be wonderful if we interface the PIR sensor to Arduino to get some cheap home security systems, isn’t it? How to Interface PIR Wireless Motion Sensor with Arduino?
Previously we had shared some alarm systems for home circuits built around discrete components. Here let me show you an Arduino based home security system using PIR for the best home security system. We will be covering interfacing of PIR sensor to Arduino, guidelines on Arduino programming, and circuit schematics. Here for demo purposes, I have used LED.
Now let’s start the home security monitoring project with Arduino and PIR sensor.
Components Required for Free Home Security System
- Arduino UNO
- USB cable
- PIR sensor
- 5V buzzer
- LED Red
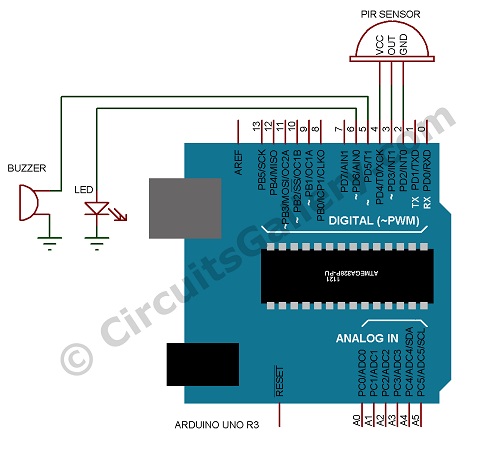
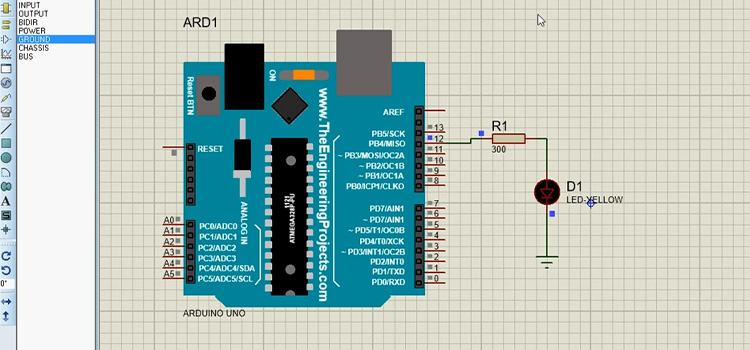
Do It Yourself Home Security Arduino Circuit Schematics
PIR Motion Sensor Working
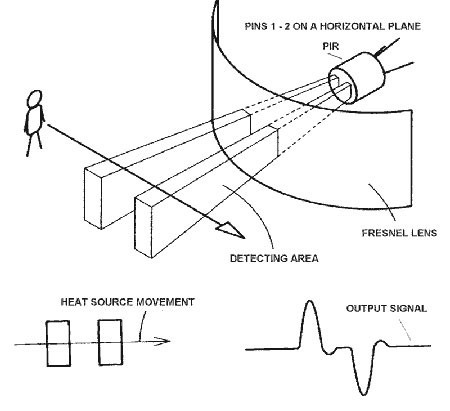
- PIR sensor has 2 slots (slits) which is sensitive to IR radiations.
- When the sensor is idle, both slots detect the same amount of IR.
- While a warm body similar to human or animals travel by, it first intercepts 1st slit, which causes a positive differential change between the two slots.
- After a while the body leaves through 2nd slot, the reverse will happen, meaning a negative differential change. These pulses can be detected.
Working Principle Of Arduino Based Home Security System Using PIR
- PIR (Pyroelectric Infrared or Passive Infrared) sensor is a motion sensor, which can detect levels of infrared radiation from human body.
- There are three pins GND, OUTPUT and VCC. The output pin will be high when any motion is detected.
- It supports 5V to 20V. Its output delay time can be adjusted from 0.3 to 5 minute, that means in case any motion is detected output will be high for particular time that can be adjusted by varying the pot.
- It can be triggered in two ways, non-repeatable trigger and repeatable trigger by changing the jumper.
- Normal or Non-repeatable Trigger: Output goes HIGH then LOW when triggered. Continuous motion results in repeated HIGH/LOW pulses. Output is LOW when idle.
- Repeatable Trigger: Output remains HIGH when sensor is retriggered repeatedly. Output is LOW when idle (not triggered).
- It will sense the motion less than 120 degree for 7 meters.
- Here PIR sensor is connected to the pins of 2nd, 3rd and 4th pins of Arduino as GND, input pin (OUTPUT pin of PIR connected) and VCC pin respectively.
- Pin 5 and pin 6 are used to connect buzzer and LED respectively which will turn ON when any motion is detected.
Arduino Programming |Guidelines On PIR Motion Sensor Arduino Code
- The three pins GND, OUTPUT and VCC of PIR sensor is connected to digital pins of Arduino (2, 3 and 4) and pin 5, 6 are used to connect Buzzer and LED which will be active when a motion is detected.
- Set the 3rd pin as input, because this pin is used to connect output pin of passive infrared sensor, which reads values from PIR sensor. Other pins are set as output.
- Pin 2 is set to LOW and pin 4 is set to HIGH, which gives GND and VCC for PIR sensor.
- The function “loop()” is an infinite loop, it continuously reads values from PIR output pin and checks if the pin is LOW or HIGH, if high it sets LED and Buzzer ON for 500 milliseconds.
- If we want to switch ON light and Fan when a person enters into the room, connect pins 5, 6 to relay through transistor (Tip: How to connect relays)
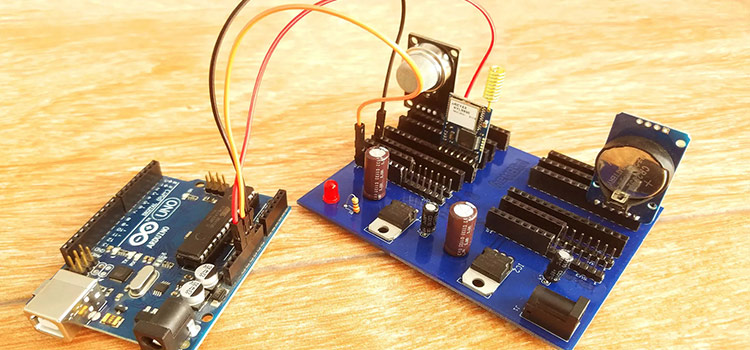
Arduino PIR Security System Installation
Installation of our Arduino-based home security systems DIY is quite simple. Extend the probes of the PIR sensor and place it somewhere you would like to create a security area. Any human/ animal interaction can be monitored and alerted by our PIR sensor and Arduino. Your home alarm monitoring services should run in real-time.
Conclusion
Our Arduino based home security system using PIR detects human movement and turns on the light with a beep sound. This project can be extended for automatic doors, security systems, automation systems, automatic lighting floor, basement, porch, bathroom, warehouse, garage, etc.
- Components Required for Free Home Security System
- Do It Yourself Home Security Arduino Circuit Schematics
- PIR Motion Sensor Working
- Working Principle Of Arduino Based Home Security System Using PIR
- Arduino Programming |Guidelines On PIR Motion Sensor Arduino Code
- Arduino PIR Security System Installation
- Conclusion
Subscribe to our newsletter
& plug into
the world of circuits


