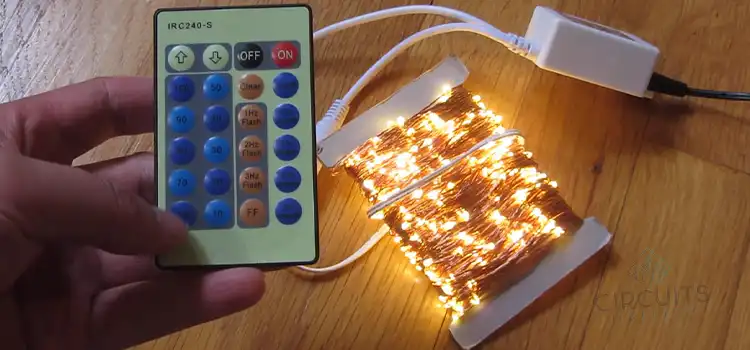
How to Connect Fairy Lights Together | A Step-by-Step Guide
Fairy lights can add a touch of magic to any space, whether you’re decorating your home, a wedding venue, or an outdoor event. But what do you do when your fairy lights don’t reach as far as you’d like? You need to learn how to connect them seamlessly. This guide will show you how to do just that with easy-to-follow steps.
Materials You’ll Need
Before you get started, gather these materials:
1. Fairy Lights: Ensure you have the same type and brand of fairy lights to ensure compatibility.
2. Extension Cords: You may need extension cords to bridge the gap between your lights.
3. Connectors: Purchase connectors specifically designed for fairy lights.
4. Electrical Tape: This will help secure your connections.
Connection Procedure
Follow these steps to connect your fairy lights, whether they come with connectors or you need to connect them manually.
Step 1: Unbox and Inspect
Carefully unbox your fairy lights and check for any damage or defects. Make sure you have all the necessary components.
Step 2: Prepare the Extension Cords
If your lights don’t reach far enough, use extension cords to bridge the gap. Plug one end into the existing lights and the other end into the new strand.
Step 3: Use Connectors
For lights that have connector options, use them. These connectors are specifically designed to join multiple strands together. Insert the male end of one strand into the female end of the other. Make sure they fit snugly.
Step 4: Manual Connection
To manually connect the sets of lights, you will need to strip a small section of the wire on both the male and female ends. Carefully twist the exposed wires together, making sure there’s a tight connection. You can solder them for a more secure connection.
Step 5: Secure the Connection
To ensure a safe and secure connection, wrap the joint with electrical tape. This will protect against moisture and keep the connection firm.
Step 6: Hide the Cords
Once the connection is secure, hide the extension cords and any visible wires behind curtains, under rugs, or along the baseboards. This will maintain the enchanting appearance of your fairy lights.
Step 7: Test the Lights
Before you complete your setup, plug in the lights to ensure that the entire chain is working correctly. If any bulbs are not lighting up, replace them.
Step 8: Final Arrangement
Now that your fairy lights are connected, arrange them to your desired effect. Let your creativity shine, whether you’re draping them on walls, stringing them across a ceiling, or weaving them through foliage.
Frequently Asked Questions
Can I connect different types of fairy lights together?
Answer: It’s best to stick to the same type for a seamless look, but it is possible to connect different types if you use the right connectors.
How do I know if I’m overloading the circuit?
Answer: Check the wattage of your lights and ensure it doesn’t exceed the circuit’s capacity, which is typically labeled on the breaker.
How do I hide extension cords effectively?
Answer: Use cord covers, clips, or strategically position furniture to keep cords out of sight.
Is it safe to leave fairy lights on all night?
Answer: LED fairy lights are generally safe to leave on all night, but it’s best to turn off incandescent lights when you’re not around to supervise them.
What should I do if my fairy lights are flickering or not working correctly?
Answer: Check the connections, replace any damaged bulbs, and make sure the plug and outlets are secure.
Can I use fairy lights for year-round decoration?
Answer: Absolutely! Fairy lights are versatile and can be enjoyed in various settings throughout the year.
Conclusion
Connecting fairy lights together is a simple process that allows you to extend their reach and create a magical atmosphere in any setting. With the right materials and a straightforward approach, you can enjoy the beauty of fairy lights in larger spaces. Follow these steps, and you’ll be well on your way to transforming any area with the warm and whimsical glow of fairy lights.
Subscribe to our newsletter
& plug into
the world of circuits
![[Answered] Is a Notch Filter an IIR Filter?](https://www.circuitsgallery.com/wp-content/uploads/2023/08/Is-a-Notch-Filter-an-IIR-Filter.webp)

![How Far Can You Run 12 Gauge Wire on a 20 Amp Circuit [Technically Explained]](https://www.circuitsgallery.com/wp-content/uploads/2023/07/How-Far-Can-You-Run-12-Gauge-Wire-on-a-20-Amp-Circuit.webp)