Dayton Drum Switch Wiring Diagram | A Comprehensive Guide
Dayton drum switches are commonly used in electric motors to control their direction of rotation. In the Dayton Drum Switch Wiring diagram, you can see all the little parts of the switch and how they link up with the motor and power source using wires.
In this article, we’ll break down the Dayton drum switch wiring diagram and explain how to read and understand the diagram.
Dayton Drum Switch Components
Dayton drum switches are reliable, strong, and outlined to resist heavy utilization. To understand the wiring diagram, let’s familiarize ourselves with the key components of a Dayton drum switch:
1. Rotating Drum
The rotating drum that functions as the heart of the drum switch can be manually turned in several diverse ways to make or break electrical connections.
2. Stationary Contacts
There are fixed contacts inside the switch housing that correspond to several motor operations including forward, reverse, stop, and off.
3. Terminals
The switch’s terminals are wired up with the motor leads and the incoming power source. The suitable wiring of the switch requires these terminals.
4. Lever or Handle
You can manually select the preferred position when operating the drum switch with a lever or handle.
5. Hot Side
This is where the power source connects to the switch.
Understanding these components is vital for correct installation and operation. If you need guidance on wiring a Dayton drum switch, online resources can provide support.
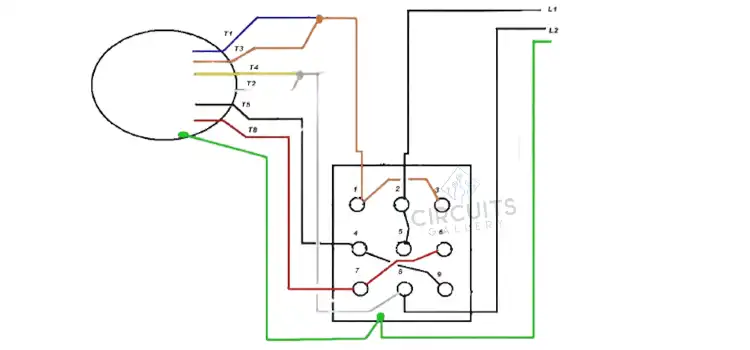
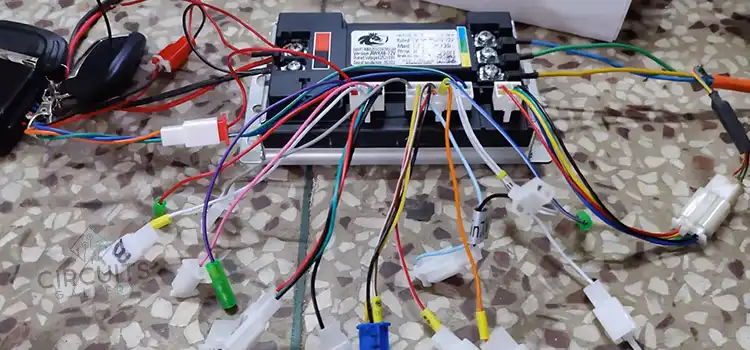
Dayton Drum Switch Wiring Diagram
Here is the Dayton Drum Switch wiring diagram:
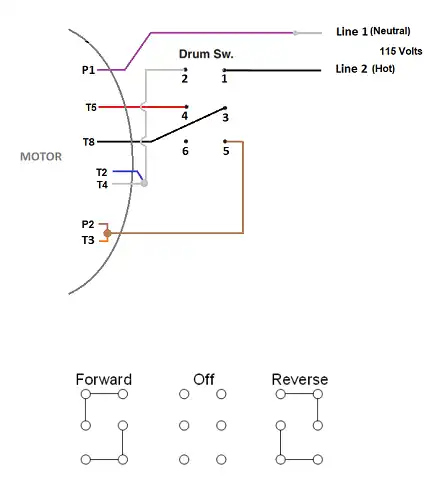
Image 1: Dayton Drum Switch Wiring Diagram
How to Read and Understand the Diagram
To understand the wiring diagram of the Dayton Drum Switch, just follow these simple steps:
1. Determine your switch type
Dayton drum switches come in different types: single-phase, three-phase, and reversible. It is important to make sure you have the correct wiring instructions suitable for your particular switch.
2. Identify motor wiring
Before diving into the wiring, take a moment to get to know the wires that are connected to your motor. Confirm that they are labeled correctly.
3. Enter conversion settings
The Dayton Drum Switch provides settings to run your engine forward, backward, or to a full stop. The diagram provides a clear picture of the connections to use for each parameter.
4. Stick to the diagram
The diagram acts as a road map, showing you exactly which wire should go to specific switch terminals. Be thorough and check your connections before operating the motor switch.
5. Ask for help when in doubt
If any part of the wiring seems to give you a headache, don’t hesitate to seek advice from a qualified electrician or consult the manufacturer’s instructions.
Remember that safety should always be your first priority when handling electrical equipment. Disconnect the power source before making the connection and wear appropriate safety equipment.
Frequently Asked Questions and Answers
How can I identify the terminals on the Dayton drum switch?
Terminals are typically labeled in the wiring diagram. They often appear as small boxes or circles with labels indicating their functions. Refer to the legend or key in the diagram for clarity.
Can I use a Dayton drum switch with any type of electric motor?
Dayton drum switches are versatile but may have specific voltage and current ratings. Ensure that the switch is compatible with your motor’s specifications to prevent overloading or damage.
Is there a difference between Dayton drum switch diagrams for single-phase and three-phase motors?
Yes, the wiring diagrams for single-phase and three-phase motors can differ due to variations in motor connections and power supply requirements. Ensure that you have the correct wiring diagram for your motor type.
Conclusion
Understanding the Dayton drum switch and its wiring diagram simplifies motor control. Safety is vital, and grasping terminals, wires, and switch settings ensures safe installations. Whether you’re an electrician or a DIY enthusiast, this knowledge empowers you to handle electrical projects confidently for efficient motor operation.
Subscribe to our newsletter
& plug into
the world of circuits
![What Is the Purpose of the Additional 4 Pin Connector on Your New Power Supply [Decoding The Mystery]](https://www.circuitsgallery.com/wp-content/uploads/2023/07/What-Is-the-Purpose-of-the-Additional-4-Pin-Connector.webp)