How to Remove Wire from Push-in Connector? | A Step-by-Step Guide
Push-in connectors are a common sight in electrical work, offering a convenient way to secure wires without the need for a screwdriver or pliers. They simplify the process of connecting wires, but what if you need to disconnect them? Understanding how to remove wires from push-in connectors is just as crucial as installing them correctly. In this guide, we’ll delve into the process of safely and efficiently removing wires from these connectors.
Necessary Tools and Safety Precautions You will Need
Before you embark on this journey of wire removal, let’s gather the necessary tools and discuss some vital safety precautions.
Tools Required for the Job
1. Needle-nose Pliers: These come in handy for gently tugging on the wire during removal.
2. Wire Strippers: To ensure you have a clean length of exposed wire for reinsertion.
3. Screwdriver (if needed): Depending on the connector type, a screwdriver might be necessary to release the wire.
Safety Precautions to Follow
1. Turn Off the Power: Before you do anything, cut the power supply to the circuit. It’s a simple step but a crucial one to prevent accidents.
2. Wear Safety Gear: Protect your eyes with safety goggles. And don’t forget insulated gloves, especially if you’re dealing with live wires.
Different Types of Push-in Connectors
Push-in connectors come in various types, and recognizing the specific connector you’re dealing with is the first step in ensuring a smooth wire removal process.
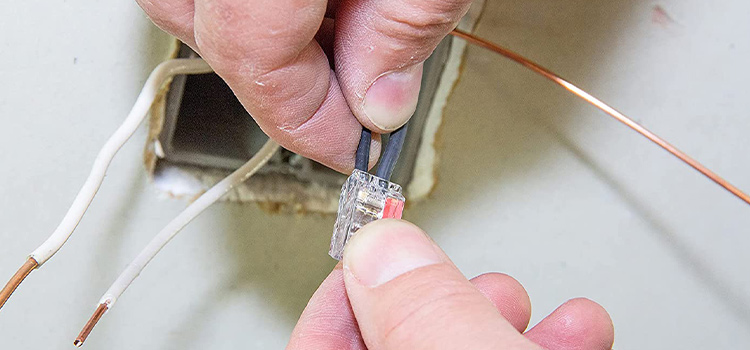
Steps for Removal Process for Push-in Connectors
Now, let’s dive into the heart of the matter—the step-by-step process for removing wires from push-in connectors.
Step 1: Turning Off Power
Safety first! Turn off the power to the circuit you’re working on. If you’re unsure, use a circuit tester to confirm the absence of electrical current.
Step 2: Preparing the Wires
You’ll want a clean, exposed section of wire to work with. Use your wire strippers to carefully remove any insulation, exposing a sufficient length of wire for the connector.
Step 3: Accessing the Release Mechanism
This is where identifying the connector type comes into play. Find the release mechanism:
Step 4: Releasing the Wire
Gently manipulate the release mechanism as per the connector type:
Step 5: Removing the Wire
With the wire released, gently pull it out. Take care not to yank or apply too much force, as you don’t want to damage the wire or the connector. Congratulations, you’ve successfully removed a wire from a push-in connector!
Common Mistakes You will Need to Avoid
As with any task, there are pitfalls to steer clear of when removing wires from push-in connectors.
1. Preventing Damage to the Connector
One common mistake is being overly forceful when trying to release the wire. Treat these connectors delicately. Excessive pressure can damage the release mechanism or the connector itself.
2. Safeguarding the Wires
Another mistake is neglecting the wires. When removing wires, ensure they don’t get tangled or damaged. A damaged wire might require replacement, so handle them with care.
FAQs About How to Remove Wire from Push-in Connector?
1. What are push-in connectors?
Push-in connectors, also known as wire connectors or terminal blocks, are devices used in electrical installations to connect wires together. They offer a convenient alternative to traditional methods of wire connection.
2. Can all wires be removed from push-in connectors?
Most wires can be removed from push-in connectors. However, it’s essential to follow the correct procedure for your specific connector type. Some connectors may have limitations based on wire size or other factors.
3. Is it safe to remove wires without turning off power?
No, it’s not safe to remove wires from push-in connectors without turning off the power. Always disconnect the power supply to the circuit you’re working on to prevent electrical shocks or accidents.
4. What happens if I accidentally damage the connector during wire removal?
If you damage the connector during wire removal, it may need to be replaced. Take care when handling the connectors to avoid any unnecessary damage.
5. Are there alternative methods to remove wires from push-in connectors?
The removal method largely depends on the connector type. However, always refer to the manufacturer’s instructions for any alternative methods they recommend for wire removal.
Conclusion
Removing wires from push-in connectors is a necessary skill in the world of electrical work. By following the step-by-step guide and taking safety precautions, you can efficiently disconnect wires without damaging the connectors. Understanding the connector type and avoiding common mistakes will help you maintain the integrity of your electrical connections. Mastering this skill ensures safe and hassle-free maintenance or rewiring in your electrical projects.
Subscribe to our newsletter
& plug into
the world of circuits