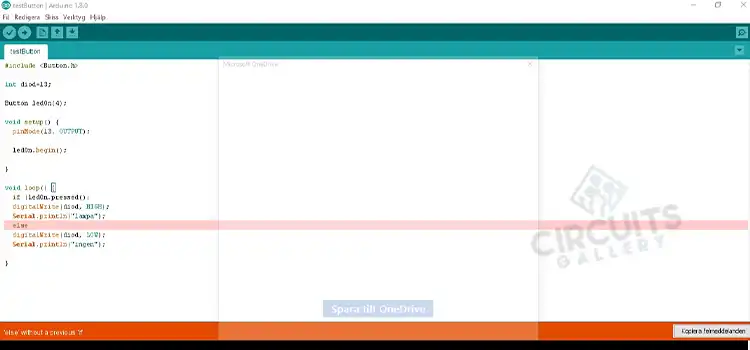
Arduino Else Without a Previous If
This is an error message of Arduino code
This error message appears when we don’t close our first if statement using a semicolon and use the next else statement.
What is else Without a Previous if
This is a message of error. When you use the else statement after ending an if statement, such as with a semicolon, you run into the problem of “else without a previous if.” Statements ending in if…else have their own block, therefore they do not end.
DO IF Statements Need an Else Arduino
If the if statement’s condition yields a false result, the else clause (if it appears at all) will be put into action. In order to perform several, mutually exclusive tests concurrently, the else might go on to another test. Up until a genuine test is encountered, each test will go on to the next.
How do I Write if else in Arduino
Conditional statements determine whether a Boolean condition supplied by the programmer is true or false. They enable you to compare a variable to another variable or test a variable against a value, allowing you to control how the program behaves depending on whether the condition is satisfied or not.
They provide the software with a lot of power and enable it to be used for a wide range of tasks.
Now I am going to discuss three basic conditional statements
- if statement
- if-else statement
- if-else-if statement.
The if Statement
The structure of an if statement is provided below:
If (conditional expression) {
Body of the if statement
}
Any expression that has a true or false outcome can be used as a conditional statement. The body of the statement’s code is run if the statement is true. The body of the code is simply skipped if the expression proves to be incorrect.
The if-else Statement
When employing an if statement, the body of the statement only executes when the condition is true. Program execution bypasses the code in the if statement’s body and instead moves to the if statement if it evaluates to false.
By including an else statement, you may have the code inside of it run, but only if the if statement it’s attached to evaluates to false.
If (conditional expression) {
Body of the if statement when the conditional expression is true
}
else {
Body of the else statement when the conditional expression is false
}
When the conditional expression evaluates to true:
- Code in the body of the if statement runs.
- Code in the body of the else statement does not run.
When the conditional expression evaluates to false:
- Code in the body of the if statement does not run.
- Code in the body of the else statement runs.
The if-else-if Statement
The if-else-if statement allows more than one conditional expression to be evaluated than the if-else statement.
Below is the basic structure:
if (conditional expression 1) {
Body of the if statement when conditional expression 1 is true
}
else if (conditional expression 2) {
Body of the else-if statement when conditional expression 1 is false and conditional expression 2 is true
}
else {
Body of the else statement when conditional expressions 1 and 2 are both false
}
In the event that conditional expression 1 is true.
The first if statement’s body contains code that executes.
The else statement and else-if statement’s body code are not executed.
In the case where conditional expression 1 evaluates to false and conditional expression 2 to true:
The else-if statement’s body contains code that executes.
The if statement’s body and the else statement’s code are not executed.
If both the results of conditional expressions 1 and 2 are false:
The else statement’s body contains code that executes.
The if statement and if-else statement’s body code are not executed.
Can You Have an if Statement Inside an if Statement Arduino
To do this, you must first create the first if statement, followed by a series of if-else statements and a single otherwise statement. You can have a single if statement without any else or if-else statements, but you must have an if statement if you wish them.
Frequently Asked Questions
Can you have two loops in Arduino
One loop function may be used to do as many tasks as necessary at once, provided that the delay function is not used to block. Two loop functions are not permitted.
Conclusion
We must correctly employ the fundamental syntax in order to start an Arduino program. If you use an if statement, you must terminate the statement before moving on to an else statement; otherwise, an error will be produced.
Subscribe to our newsletter
& plug into
the world of circuits


![Arduino Uno Programmer Not Responding [Troubleshooting Guide]](https://www.circuitsgallery.com/wp-content/uploads/2023/12/Arduino-Uno-Programmer-Not-Responding.webp)